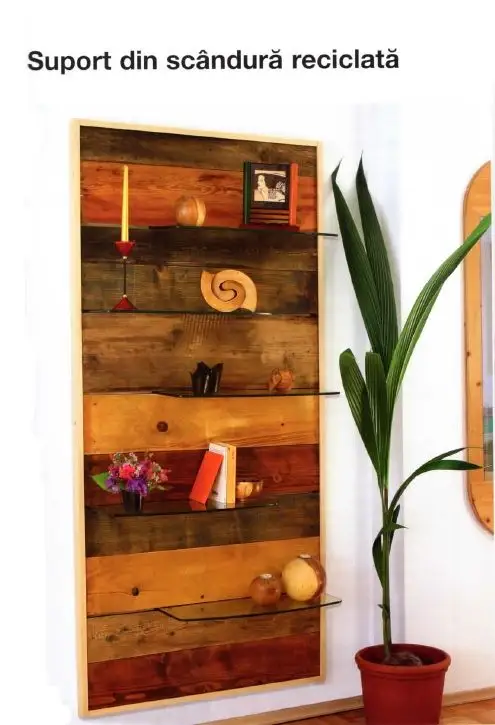
Old planks framed and combined with glass shelves give this shelf a unique look. It is sure to attract admiring glances.
Materials needed
Recycled planks, approximately 20mm thick. The length will be 800-900mm. The sum of the widths of the planks is approximately 2000 mm (height of the shelf)
5 mm thick wooden lath.
2 pieces of long covering lath, right and left side, 2000x40mm
2 pieces of long covering lath, right and left side, 2000x20mm
2 pieces of upper and lower covering lath, 1000x40mm
2 pieces of upper and lower covering lath, 1000x20mm
The exact dimensions will be determined based on the size of the shelf.
10 mm thick modeling lath
10 pieces of 1000x10mm. The exact dimensions will be determined based on the size of the shelf.
4 mm thick stratified veneer
5 pieces of 100x300mm. The exact dimensions will be determined based on the size of the shelf.
Transparent, rounded glass shelf, 8mm thick, 5 pieces of 600 x 240mm
Hooks with screws and eyelet, 4 pieces of 90x25mm
L-shaped steel profiles (corner) (their length corresponds to the height of the shelf, i.e., the sum of the widths of the planks), two pieces L profile 16x16mm
Right hook screws (for wall mounting), 4 pieces of 5.4x60mm
Plastic wall plugs for screws, 4 pieces, depending on the size of the hook screw
Nails with a length of no more than 20mm
Self-tapping screws, 8 pieces per plank, 4x35mm
Paint and/or lazure paint for renewing the surfaces of the planks
1. First, you need to remove the nails from the recycled plank. Then the surfaces will be cleaned with a wire brush and sanded with a coarse abrasive sheet. Paint or lazure paint can be applied to the surfaces as desired, and then they must be sanded again so that the grain remains visible.
Remember that the height of the shelf can be changed, the width depends only on the dimensions of the glass shelf, in case we buy it already cut.
2. The planks are cut with the "mouse tail" jigsaw to the desired size (this determines the width of the shelf). The dimension is determined by the shortest plank. It should not be narrower than 800mm and not wider than 900mm.
3. For a test, you need to place the planks on the floor, close together, paying attention to the diversity of colors and widths of the planks. The glass shelves are inserted between the planks, according to the image, so that they are placed at equal distances from each other. Two planks should remain without glass shelves at the top and bottom.
4. Remove the glass shelves and turn each plank over with the front side facing down. Insert the reversed glass shelves back into their original positions. Position the steel profiles at the end of the plank on the right and left sides. If necessary, the steel profiles can be adjusted to size with a delta sander.
Screw the steel profile onto each plank, making sure they are joined very well together and the glass shelves are securely fixed.
5. After fixing the planks, mark the location of the glass shelves, then remove them.
The modeling battens must be cut to a length of 600mm (the length of the glass shelves). The battens are fixed above and below the glass shelf using short nails, making sure that the battens are always at a distance equal to the thickness of the glass. Care should be taken to ensure that the glass shelves are placed stably between the battens.
The batten that ensures stability from the bottom of the shelf must be fixed 0.5mm deeper than the edge of the batten. The glass shelf would move down under its own weight, but the batten keeps it in a horizontal position.
7. The problem of gaps forming next to the glass shelves needs to be solved, as the wall would be visible through them. The gaps are covered with thin stratified plywood, cut to size, screwed or nailed to the back of the shelf (see sketch of the back part in the gallery)
8. To be able to fix the shelf to the wall, you need to screw on the back of the shelf, at the edge of every second top and bottom batten, 4 suspension supports for the shelf. The suspension supports have several fixing holes according to the sketch, and one hole is for the hook screw in the wall.
On the back of the top batten, a recess is made with a flat chisel at the location of the hanger.
9. Next, the self-supporting covering battens are placed. The side covering battens are cut to a width of 40mm: for the length of the shelf, add 5mm for each corner. Battens with a width of 20mm, cut to the same length, must be glued onto the wider battens.
Next are the top and bottom covering battens: the wide ones, 40mm, have a length equal to the width of the shelf, while the narrow ones, 20mm, are shorter by 30mm (15mm on each side, this dimension being obtained by subtracting the thickness of 5mm from the width of 20mm).
The thinner battens are glued onto the wider batten one by one, as shown in the image, with the right edge. The covering battens will be assembled after the shelf is hung on the wall.
10. Horizontally and vertically, measure the distance between the holes made for the hangers on the back of the shelf. Using a plumb bob, mark the four points on the wall where the shelf is to be mounted. Drill holes in the wall, sized according to the expansion plugs corresponding to the hook screws, then place the wall plugs into the holes and screw in the screws.
Attach the shelf with two screws. The finished support is quite heavy, so it is recommended to ask for help when handling and mounting it on the wall.
11. Next, place the covering battens. Starting with the longer side, fix the top, middle and bottom covering battens. After applying the two vertical covering battens, apply the horizontal ones, which will be fixed near the corners using a nail.
12. Place the glass shelves in their position and push them against the wall. If a shelf is not in a horizontal position, insert a wooden wedge into the gap under the glass shelf.
Glass shelves with rounded edges are much more expensive than those with straight edges, but considering that the sharp edges extend towards the interior of the room, they could pose a risk of injury. The glass shelves in the images were assembled alternately, leaning against the steel profile on the right and left sides respectively.
Of course, these shelves can also be arranged asymmetrically.